
When preparing to present a thesis, capstone project, or dissertation, it is best to create an abstract poster. The poster will help you to give potential attendees the information they need to decide if they will attend your presentation.
Nurses, clinicians, and researchers share information on programs they develop or their studies through abstract posters. It aids in sharing clinical wisdom and advancing the knowledge of nursing and other healthcare professionals. Presenting poster abstracts is a common practice in conferences and seminars.
In this post, we will reveal everything you need to know about creating an abstract poster. You should be able to create a brilliant abstract poster when you read this article.
An abstract poster, aka poster abstract, is essentially an advertisement for a research presentation, and it is prepared by the research author to give potential presentation attendees a glimpse of the research.
A poster abstract is typically 300 words long, and it takes between 30 minutes to 60 minutes. Writing takes longer because it involves summarizing an entire research project into a one-page summary.
A good poster abstract uses a few sentences to capture the essence of a research project perfectly, and it is not and should never be just a basic summary of a research project.
When asked to write a poster abstract for a conference, you will most likely be given some requirements to follow. The requirements will undoubtedly include the format to follow, the word limit, and the deadline to adhere to.
A well-written abstract describes the research questions, PICOT questions, or clinical problems. It also entails the methods used to address the clinical issues and the significance and implications of the results.
When tasked to write a poster abstract, or if you are doing one for an upcoming nursing or interprofessional conference relevant to your field, you must make sure it includes the following parts:
An abstract for a nursing capstone project will slightly differ. It will have the following sections:
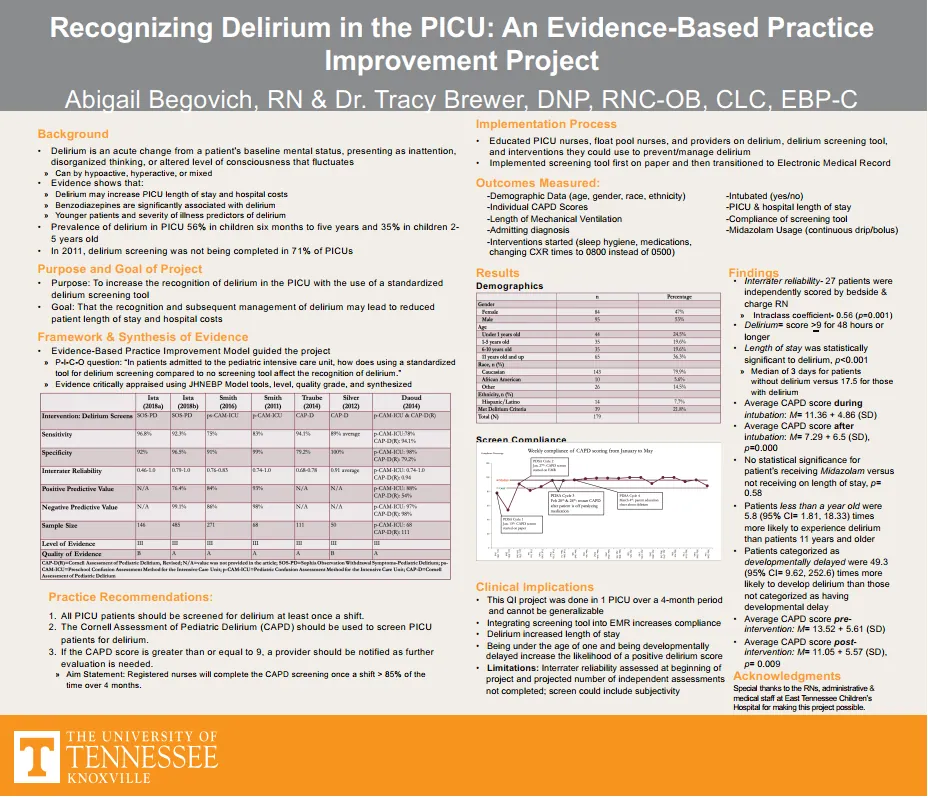
Check the example below from The University of Tennessee Knoxville
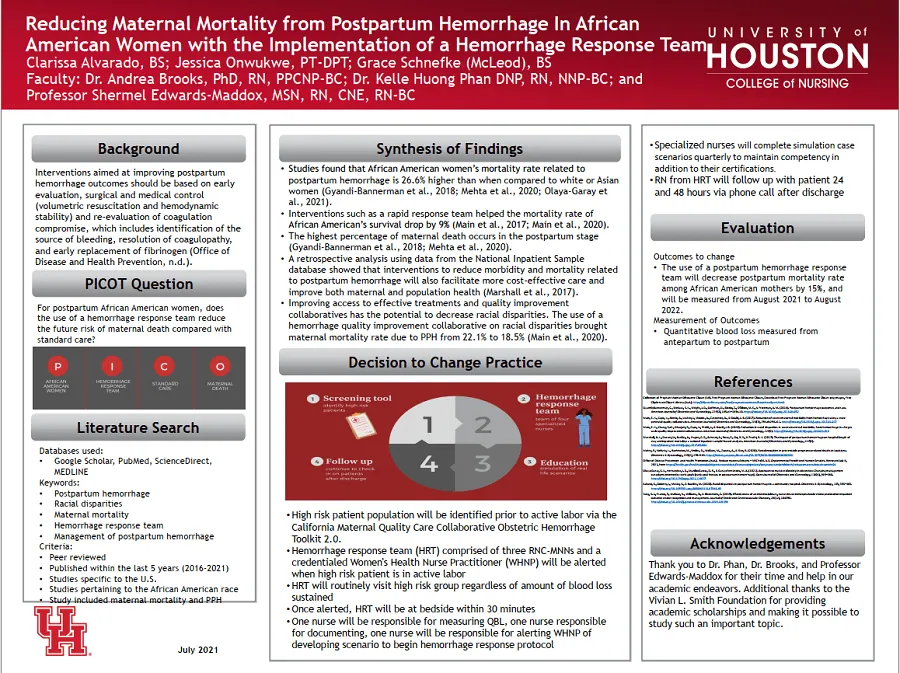
If you are focusing on a change project or a Quality improvement project, it will include the background; PICOT question; literature search, synthesis of findings; recommended changes to practice; evaluation; references; and acknowledgments. See the attached example from the University of Houston (College of Nursing)
Your journey to making an excellent abstract and a poster begins by searching for upcoming nursing conferences or other related interprofessional seminars. You can also ask your colleagues about their experiences and the conferences they have attended. Your mentor can also come in handy but make sure you read the call for abstract posters to know what is expected, such as the scope of the conference and how to design the posters.
Planning is the first thing you need to do regarding your poster presentation. During your presentation, brainstorm and think about what you want people to know about your research, and Note down everything you want them to know.
These notes will help you ensure your abstract is comprehensive and genuinely insightful. You should also create enough time to work on your abstract and poster before the deadline.
When planning, reviewing abstracts from past conferences or classes is best. Study them for style, content, and scope so that yours succeeds. Preparing your information dissemination process should commence early so that you cover all the mandatory aspects.
This is the most important part of your poster abstract preparation process. A good poster abstract is short and clear. Be sure to include all the important details of your work in the abstract poster. It is, however, best to avoid having your work’s fine details in the poster abstract. And similar to all other academic writing styles, any statement requiring a reference within the abstract should be referenced (cited). You are, nonetheless, advised to limit the specific need for references in your abstract; only the important referable statements should be included.
When drafting the abstract, ensure you meet the correct length, use relevant headings and sections, and include citations. It would be good to let your thoughts flow at first when drafting so that you shorten the draft as you edit and proofread it.
Below is an excellent example of abstract criteria that you can use when writing your abstract:
When you finish the initial draft, setting aside a day or two to refresh your mind and be as objective as possible is important. After the break, read the draft with a “fresh” pair of eyes so that you can notice and eliminate redundancies and errors, and reword the entire abstract.
If you spot any unclear statements or jargon, make the necessary corrections. As you review, assess the flow and logic of your abstract and correct it as necessary. Ensure that all clinical jargon and abbreviation is illustrated in a way that makes sense to the target audience.
It would help if you also welcomed your peers to review the abstract. The rationale of a peer review is to ensure that the errors, omissions, and mistakes that escaped your eyes are arrested and corrected. You can consult your supervisor or mentor for a critical peer review.
Suppose you can get someone outside of your discipline, the better because they will breathe a fresh perspective on the clarity and logic of the content. As intimidating and rigorous as it might be, a peer review often helps you submit an abstract that makes sense. Besides, you can make a poster that comprehensively addresses the readers' needs.
Designing the poster is the most fun part of the entire process. There are, however, certain rules that you might have to follow before you begin. First and foremost, confirm the required poster size and poster orientation; landscape or portrait. If uncertain, the safest guess is a portrait, which will most likely fit on the conference’s typically sized-poster boards.
It is also important to choose the software within which you’ll design your poster. The most often used options are Adobe Illustrator, Microsoft Office PowerPoint, and CorelDraw. Whichever software you choose; you should always begin by setting up the page size. Let’s say somebody is a meter away from the conference board; the smallest font size they’ll be able to read quickly is around 20 points, assuming your page is appropriately sized.
With regard to readability, light writing on dark backgrounds and vice versa works well, and the restricted usage of varying font types and sizes also works great. Simply put, it is a delicate balance between utilizing these particular aspects to offer structure to your presentation and excessively complicating your structure, making it hard to navigate.
Use diagrams instead of words to describe key principles, methods, and outcomes if possible. Apart from being visually appealing, diagrams are quicker and easier for individuals to process. Remember that people typically spend a few seconds or minutes reading each poster, so the simpler the information is to absorb, the better.
Consider using software features like guides and snap-to-grid when presenting your details on the poster. This is vital as small disparities in alignment on the computer monitor can be emphasized on a poster printout. That said, attention to detail is vital. Proofreading a poster when restricted to a small size monitor is usually challenging. For that reason, you should consider requesting a colleague or friend to take another look for any typing errors.
All authors of the work and their institutional affiliations should be included in the poster’s upper title section. The presenter and the poster’s designer typically sit as the first author and the work’s principal investigator or most senior author as the last author. For the order of the middle authors, the team is left to discuss and agree. Any acknowledgments to organizations and individuals that are not authors are featured at the bottom of your poster.
Printing out your poster is the last step. As you think about designing your poster, you should also think of this particular step, as it is crucial to have knowledge of the printing timescales. The chosen printer could provide same-day service or might take a couple of days to turn around if busy. You may also need to send your poster off-site for other purposes, like lamination.
The paper’s weight not only determines the cost of the print but also how robust the poster will travel (the thicker the poster, the more robust).
Laminating the poster adds an extra protective layer to it, consequently increasing its lifespan, making it much more resistant to water but also making it costlier and weightier to transport.
It is advisable to print out a mock-up version (A3 or A4) to look for any design issues, typing errors, and alignment concerns before investing in the final version of your poster.
Now that your poster is ready, you can prepare to discuss it with others. Come up with a brief oral presentation you can recite on the day, increasing your confidence in the conference presentation.
Once you get there, just be calm and enjoy the experience. And if you are interested in networking or sharing your results with the conference audience, you should consider preparing A4 flyers for your poster.
There are various poster pitfalls that you should avoid when making a poster. Some, like avoiding including too much detail or too many images, are a no-brainer. Let’s look at some of the best practices you should consider when making a poster to present your project, capstone, or dissertation.
An abstract poster is a complex thing but the easiest of all to design when you have a structured approach. It may not be part of your research, but it is vital to communicate what you did to the world at the end of your research. As a re-cap, an effective poster should at least meet the following criteria:
An effective poster presentation will help your readers understand your main points. Less is more when making a poster. Therefore, ensure you have adequate white space to improve its readability. At the same time, use colors and images sparingly.
If you are given a poster template from class, ensure that you use it because it has a predefined format that can help you actualize your professor's expectations. With the structure and the steps for preparing a poster abstract, we are confident you can make an outstanding one. Feel free to apply the tips to compose a brilliant presentation poster.
If you feel like you need any assistance to prepare an abstract poster, hit us up. Go to our home page and make an order for your poster. Our nurse writing expert will take up your order and deliver an abstract poster ASAP. It will be original, compact, and with zero errors.
Our per-page prices are affordable, and we do not charge extra for revisions.
Related Readings:
NurseMyGrades is being relied upon by thousands of students worldwide to ace their nursing studies. We offer high quality sample papers that help students in their revision as well as helping them remain abreast of what is expected of them.
Get Help